Baking chimichangas gives you the crispy shell without the mess. No deep fryer. No splatter. Just golden-brown tortillas with juicy chicken filling.

Crispy Baked Chicken Chimichangas are golden-brown flour tortillas filled with juicy, well-seasoned chicken. Bake at 400°F with a light oil spray to achieve a crunchy shell without frying or sogginess.
The technique matters more than the recipe. High heat, oil spray, and proper folding create that restaurant texture at home. Flour tortillas crisp beautifully in a 400°F oven, and the filling stays moist if you season it right.
Serve with a cool tangy side or eat them straight off the sheet pan. These reheat well for meal prep and freeze perfectly for quick dinners later.
Why This Recipe Works
This method delivers crispy exteriors without deep frying, making it lighter and less greasy than traditional chimichangas. The combination of high heat and oil spray creates golden-brown tortillas with juicy, well-seasoned chicken inside.
Remember it later
Planning to try this recipe soon? Save it for a quick find later!
- High heat crisps the shell. Baking at 400°F browns the tortilla evenly without steaming it.
- Dry filling prevents sogginess. Patting the chicken and vegetables dry keeps moisture from making the shell limp.
- Oil spray creates crunch. A light coating on the outside ensures crispy texture, not rubberiness.
- Cheese melts inside. Adding shredded cheese to the filling creates creaminess without watering down the mix.
- Tight folding locks it in. Tucking the ends underneath prevents the filling from leaking during baking.
What You'll Need
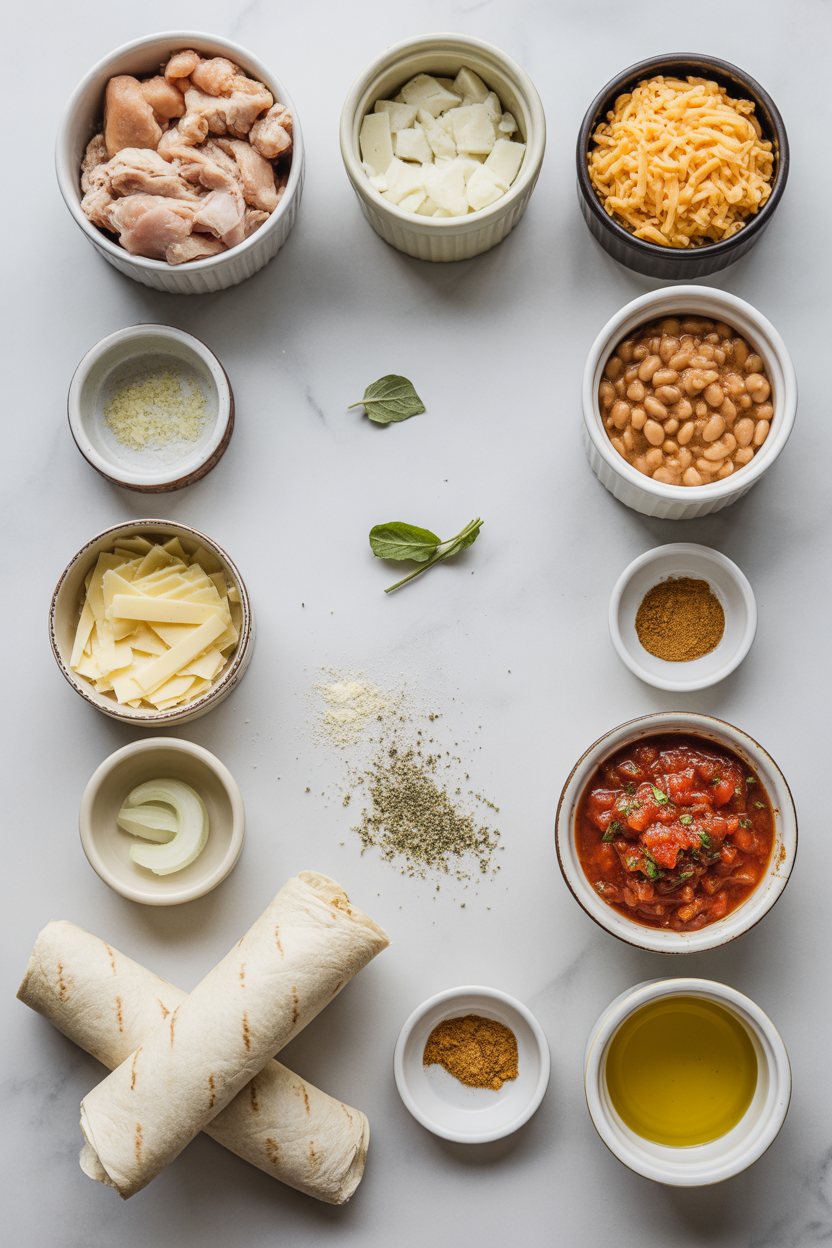
The filling relies on seasoned shredded chicken, cheese, and just enough salsa to keep things moist without making the shell soggy. For more easy chicken dinners that come together fast, the same prep-ahead approach works.
- Cooked chicken breast or thighs
- Shredded rotisserie chicken
- Large flour tortillas
- Cheddar or Monterey Jack cheese
- Sour cream
- Salsa or enchilada sauce
- Cumin
- Chili powder
- Garlic powder
Ingredient Details
- Shredded chicken Use rotisserie chicken for speed, or poach chicken breasts in seasoned broth for 15 minutes and shred.
- Flour tortillas Large size (10-inch) works best for folding-medium tortillas are too small to seal properly.
- Cheddar cheese Shred from a block for better melt and less clumping than pre-shredded.
- Salsa Medium or mild salsa adds moisture without making the filling watery-use chunky style and drain excess liquid.
- Cumin Ground cumin gives the filling that authentic Mexican flavor-add ½ teaspoon per cup of chicken.
- Cooking spray Light olive oil or vegetable spray works-brush on evenly to avoid greasy spots.
- Sour cream Serve on the side rather than mixing into the filling to prevent sogginess.
Ingredient Swaps
If you want another potatoes option to balance the plate, crispy roasted vegetables work just as well. Swaps keep the texture and flavor intact while working with what you have.
- Ground beef or turkey - Brown and drain well, season the same way for similar texture.
- Black beans - Mash half and leave half whole for a vegetarian filling that still holds together.
- Corn tortillas - Fry lightly first to prevent cracking, but expect less pliability than flour.
- Vegan cheese - Use a meltable variety like Violife or omit entirely and add extra avocado for creaminess.
Protein Swaps
Works for: Ground beef, turkey, or black beans give similar texture if seasoned well and drained properly
Skip if: You want the exact juicy shredded texture-chicken stays moist better than ground meat
Tortilla Swaps
Works for: Corn tortillas after a quick fry in oil to soften them, or whole wheat flour tortillas for more fiber
Skip if: You need guaranteed crispness-corn tortillas crack easily and require extra care
Instructions
Start with everything measured and ready. Assembly goes fast once the oven is hot.
Preheat oven to 400°F and line a baking sheet with parchment paper. Place a wire rack on top if you have one for even air circulation.
Mix shredded chicken with salsa, cumin, chili powder, garlic powder, and half the cheese in a bowl. Stir until the chicken is evenly coated and the filling holds together without being soupy.
Warm tortillas in the microwave for 20-30 seconds wrapped in a damp paper towel. Spoon ⅓ cup filling into the center of each tortilla, fold in the sides, then roll tightly from the bottom and place seam-side down on the baking sheet.
Spray the tops and sides of each chimichanga lightly with cooking oil. Bake for 20-25 minutes, flipping halfway through, until golden brown and crispy.
Let rest for 3-5 minutes before serving. Top with remaining cheese, sour cream, and fresh cilantro if desired.
What to Serve With It
These chimichangas work well with simple sides that add freshness and crunch without competing for attention. For complete Shoyu Chicken pairing ideas, similar sides balance richness with brightness.
| Side Dish | Prep | Why It Works | How to Serve |
|---|---|---|---|
| Cilantro-lime rice | Easy | Absorbs extra sauce and adds freshness | Fluff with lime juice and chopped cilantro |
| Black bean salad | Easy | Protein-rich, adds cool crunch | Toss with corn, peppers, and lime dressing |
| Guacamole | Easy | Creamy contrast to crispy shell | Mash avocados with lime, salt, and diced onion |
| Mexican street corn | Medium | Charred sweetness balances spice | Grill or broil corn, coat with mayo and cotija |
| Pico de gallo | Easy | Bright acidity cuts through richness | Dice tomatoes, onions, jalapeños, and cilantro |
Three ways to serve it:
- With refried beans - Warm on the side for a classic Mexican plate.
- As a party platter - Cut each chimichanga in half and arrange with dipping sauces.
- Over shredded lettuce - Creates a taco salad effect with extra crunch.
Store and Reheat
Chimichangas hold up well in the fridge for quick reheating, but the key is keeping the shell crispy. Store cooled chimichangas in an airtight container for up to 3 days. Pair leftovers with this creamy sauce for dipping.
| Method | Time | Best For |
|---|---|---|
| Oven at 375°F | 10 min | Restores crispness without drying out filling |
| Air fryer at 350°F | 5 min | Fastest way to crisp the shell evenly |
| Microwave covered | 2 min | Quick but softens shell-fine if you don't mind texture change |
- Cool completely before storing - Condensation makes the shell soggy if packed warm.
- Freeze for up to 2 months - Wrap individually in foil, then place in a freezer bag-reheat from frozen in the oven at 375°F for 20 minutes.
- Skip the microwave for best texture - It steams the shell instead of crisping it, but works in a pinch if you're short on time.
- Reheat on a wire rack - improving the chimichangas during reheating keeps the bottom crisp instead of steaming against the pan.
- Add fresh toppings after reheating - Sour cream, guacamole, and salsa taste better added at serving time rather than before storage.
Frequently Asked Questions
Corn tortillas crack easily when folded, but you can use them if you fry them lightly in oil first to soften. Warm them until pliable, fill quickly, and handle gently during folding. Expect a different texture-corn tortillas crisp faster and can burn around the edges if not watched closely.
Too much moisture in the filling or not enough oil on the outside causes sogginess. Drain salsa or enchilada sauce before mixing with chicken, pat the filling dry with paper towels, and spray the tortillas generously with cooking oil. Baking on a wire rack instead of directly on the pan also helps air circulate for even crispness.
Assemble chimichangas up to 24 hours ahead, cover tightly with plastic wrap, and refrigerate. Spray with oil just before baking. Add 3-5 minutes to the baking time if they go into the oven cold. For longer storage, freeze assembled chimichangas before baking and cook from frozen at 400°F for 30-35 minutes.
The chicken is already cooked before assembling, so you just need to heat everything through. The internal temperature should reach 165°F after baking to ensure it is hot and safe to eat. Use an instant-read thermometer inserted into the center of the filling to check.
Overfilling causes splitting, and cold tortillas crack during folding. Use no more than one-third cup of filling per tortilla, warm them before assembling, and fold tightly with the seam side down on the baking sheet. Secure with toothpicks if needed, but remove them before serving to avoid accidents.
Crispy Baked Chicken Chimichangas
Ingredients
Equipment
Method
- Preheat oven to 400°F (204°C) and line a baking sheet with parchment paper. Place a wire rack on top if available for even air circulation.
- Mix shredded chicken with salsa, ground cumin, chili powder, garlic powder, and half the shredded cheese in a mixing bowl. Stir until the filling holds together without being soupy.
- Warm flour tortillas in the microwave wrapped in a damp paper towel for 20-30 seconds until pliable.
- Spoon ⅓ cup of filling into the center of each tortilla. Fold in the sides and roll tightly from the bottom. Place seam-side down on the prepared baking sheet.
- Spray the tops and sides of each chimichanga lightly with cooking oil. Bake for 20-25 minutes, flipping halfway through baking, until golden brown and crispy.
- Let the chimichangas rest for 3-5 minutes before serving. Top with remaining shredded cheese, sour cream, and fresh cilantro if desired.